
End of Abyss Suit Mods: All 10 Mods, 8 Vaults & 6 Energy Cells
Every suit mod, vault, and Energy Cell in End of Abyss — where all 10 mods and 8 Vault Keys are, plus the 6 Energy Cells that unlock extra mod slots.
Suit Mods are End of Abyss’s passive-equipment system — rings, essentially: each mod grants a passive effect while equipped, and each Energy Cell you find adds one slot. The economy tying it together is Vault Keys — five drop from story bosses, three from the optional bosses — and they open the eight Vaults holding most of the collection.
How the system works
- Vault Keys: Husk Cluster, Centipede Husk, Security Sentinel, Drowned Husk, Radiation Host (story) + Centipede rematch, Brood Keeper, Morgue Dweller (optional). Eight keys, eight vaults.
- Energy Cells: six hidden pickups; each = +1 mod slot. All six earn the “Fully Suited Up” trophy.
- All eight vaults: the “Dungeon Crawler” trophy. Nothing is missable.
All 10 suit mods
| Mod | Effect | Location |
|---|---|---|
| Vitality Enhancer Mk. I | Max health up | Starting mod |
| Radiation Protection | Blocks ambient radiation damage | The Basement under Factory East — story pickup (part 5) |
| Equipment Belt | Extra equipment capacity | Vault — Habitation F1, end of the hall |
| Vitality Enhancer Mk. II | Bigger max health up | Vault — Communication Center F2: right-side lift down, door right, trap door (after the 3 SCUs) |
| Heal Amplifier | Stronger healing | Vault — Reactor B4, top-left corner |
| Blast Resistance | Reduced explosive damage | Vault — Factory West F2, left side (Explosive Charge wall) |
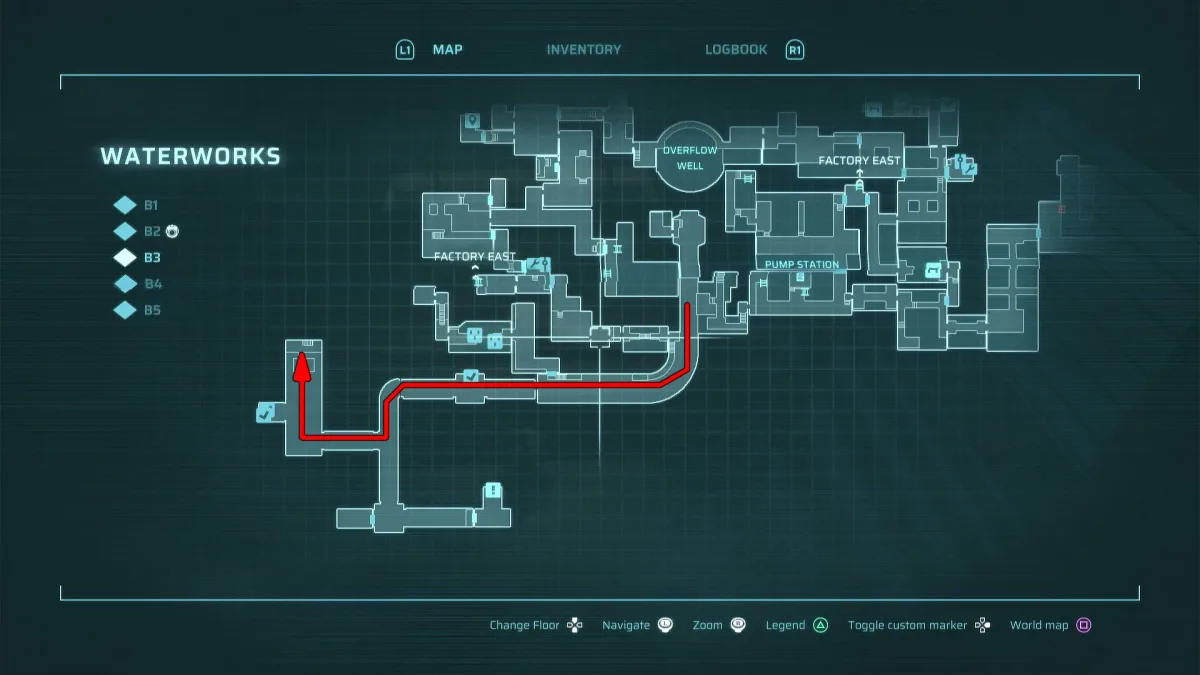
| Acid Neutralizer | Blocks acid damage | Vault — Waterworks B3, in the drained pit after the switch+pump sequence |
| Proximity Sensor | Warns of nearby threats | Vault — Containment F1 bottom-right: burn the Parasitic Growth, ladder down (Incinerator) |
| Auto-Defibrillator | Survive a lethal hit | Vault — Infirmary B1, left side |
| Experimental Core | Prototype passive | Vault — Lower Levels F1, needs Level 3 Access |
The Level 2 and Level 3 Access cards
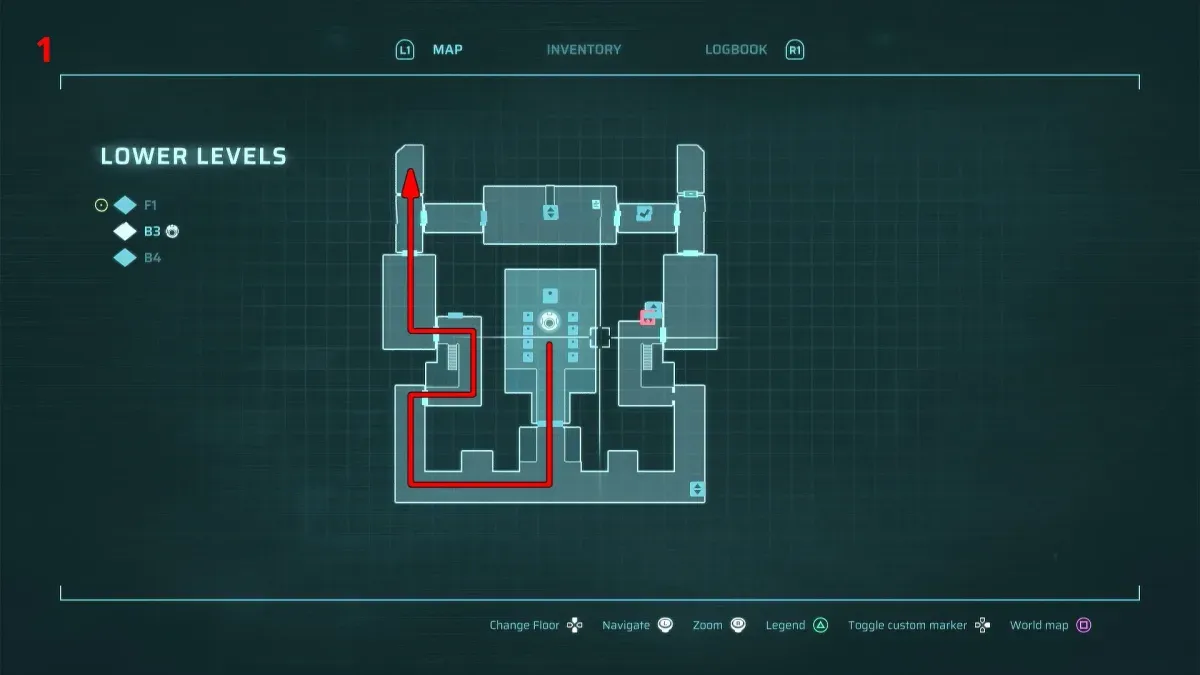
The Experimental Core vault is behind Level 3 Access — a two-card chain inside Lower Levels F1:
- Level 2 Access: burn the wall on the right side of F1 with the Incinerator, enter the large room, drop through the trap door in the middle, exit the vents, head right — the card is on a corpse.
- Level 3 Access: through the door just south of the burnable wall on F1, up the stairs, through the corridor, exit left then left again — top-left corner of the room.
- The vault sits behind the right-side door on F1.
All 6 Energy Cells
| # | Location | How to reach it |
|---|---|---|
| 1 | Maintenance > F2 | Large chest in plain sight — on the part 3 path |
| 2 | Factory West > F3 | Explosive Charge the wall left of the bridge switch, then a second charge on the hall’s left wall |
| 3 | Habitation Sector > F2 | Burn the F1 left wall → Block A Keycard → F3 vent route → Explosive Charge floor → Janitor Key → Block B room |
| 4 | Reactor > B3 | Ladder in the top-left corner of B4 |
| 5 | Waterworks > B3 | Grappling Hook the switch above the door |
| 6 | Containment Sector > F2 | Destroy the petrified worker — shoot or melee it |
Priorities: Cells 1 and 2 sit almost on the critical path — grab both before the Containment Sector, because Radiation Protection eats several slots at once and you’ll want real mods underneath it. Cell 3’s Janitor Key chain is the longest detour; pair it with Data Shard 2 on a Habitation sweep.
Recommended loadouts
- Story progression: Vitality Mk. I + Radiation Protection when required + Equipment Belt.
- Boss attempts: Vitality Mk. II + Blast Resistance + Proximity Sensor — awareness beats greed in fights like the Fractured Being.
- Post-game cleanup: Auto-Defibrillator for risky optional bosses + Proximity Sensor for ambush rooms.
Kit context: weapons overview · full checklist: logbook completion.
Related Articles

End of Abyss Fractured Being: Final Boss Strategy (Both Phases)
Fractured Being final boss guide: phase 1 melee, grab and gravity attacks, phase 2 tendrils and shockwave — plus the stagger trick that trivializes its pull.
Last updated Oct 5

End of Abyss Optional Bosses: Brood Keeper, Morgue Dweller & Rematch
All three optional End of Abyss bosses — the Centipede rematch in the Reactor Pool, Brood Keeper in the Tunnels, and Morgue Dweller in the Infirmary.
Last updated Oct 5
End of Abyss Cheat Codes: All Codes & How the Cryptograph Works
End of Abyss has 6 scanner-hidden cheat codes activated via the Cryptograph key item — every confirmed location plus the trophy warning you must read first.
Last updated Oct 5
Was this helpful?
Thanks for the feedback!