
End of Abyss Walkthrough Part 3: Factory West, Maintenance & SCU 1
Walkthrough part 3: find the Mechanical Crank and Explosive Charges in Maintenance, beat the Security Sentinel, and override SCU 1 in Factory West.
Part 3 starts the three-SCU mid-game. Factory West and Maintenance hand you two permanent tools — the Mechanical Crank for Extendable Bridges and Explosive Charges for weak walls — before the Security Sentinel guards the first override. Explosive Charges are the single most important unlock for backtracking; almost every Data Shard and optional room in the game sits behind one.
Enter Factory West and Maintenance
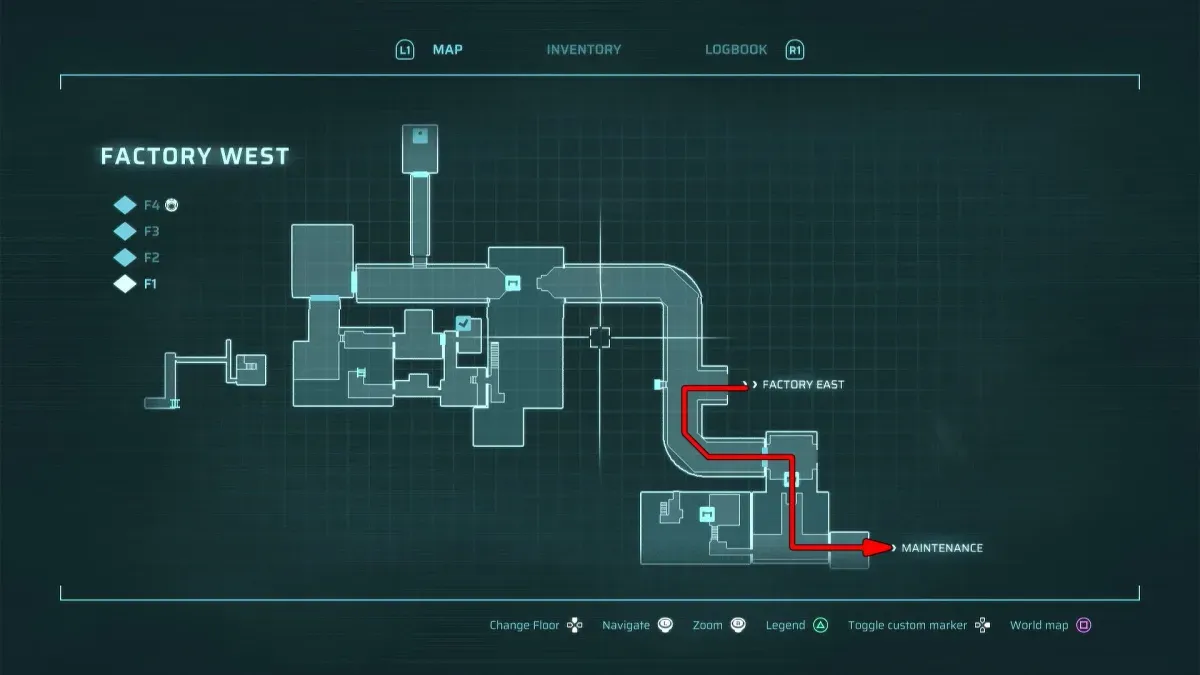
Leave the elevator room through the door on the left into Factory West, then drop to the bottom right corner and enter Maintenance.
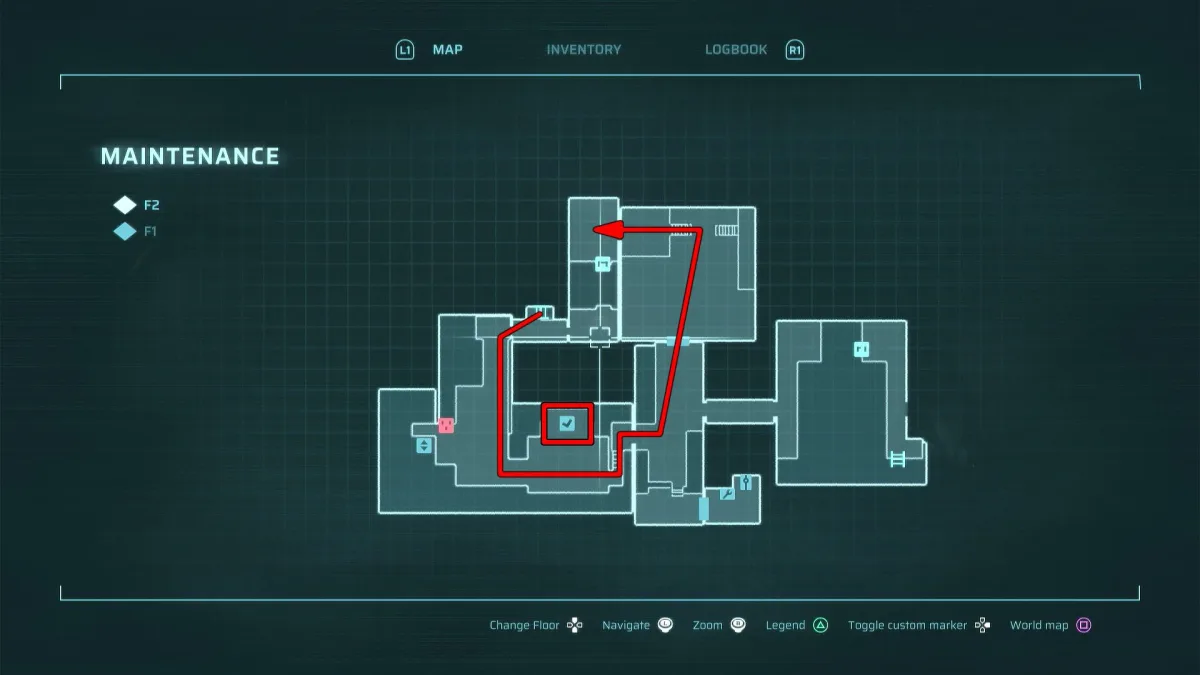
- Follow the only path through Maintenance until two small robot enemies attack — the facility’s machines are hostile too.
- Past them is a large chest in plain sight: Energy Cell #1, a permanent extra suit-mod slot. You’ll need it — the story-required Radiation Protection mod costs multiple slots, so grab every cell you see (all six are in suit mods and energy cells).
- Continue right and up to a room with more robots. Clear it and take the top-left door for the Mechanical Crank — the tool that operates Extendable Bridges.
Bridge your way through Factory West
Extend the Maintenance bridge, backtrack west, and extend the Factory West bridge — the Crank turns gaps into routes.
- Back in Factory West, head directly west from the Maintenance exit and crank the bridge across.
- Push on to a safe room, then continue left, down, and right to an Energy Node door: scan the walls, shoot the three nodes, and it opens.
- In the room with a short staircase leading to a door on the right, smash the boxes before the stairs to reveal a hidden vent.
- Through two vents, ride the lift up, head down and left, and press the switch to extend a bridge.
- Cross it and you’ll re-enter the earlier safe room from its upper level — kick the ladder down (permanent shortcut), exit top right, and press the next switch to extend the bridge below.
Claim the Explosive Charge
Climb down, cross the new bridge, and fight through the robot room — the Explosive Charge tool is behind the left door. Charges blow open cracked “weak” walls and floor patches. If you run out, craft more at safe-room workbenches. From here on, a wall that looks wrong almost always is — the scanner confirms which ones break.
The weak-wall route to the boss
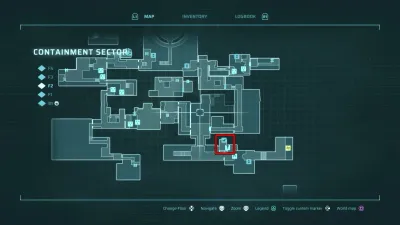
- Return to the safe room, exit left toward the lift area, and look for a weak wall — plant a charge (hold the button, release, then shoot or press again to detonate).
- Continue left to a room full of boxes. Smash them, open the trap door, and drop into the area below.
- Follow the path to a room with robots and a central ladder going down — and a safe room on the right. This is your boss staging point; use it.
- Down the ladder, you’ll find a weak patch in the floor. Before dropping, open the door on your left — it’s a shortcut back to the safe room. Then blast the floor and drop.
Boss: Security Sentinel
The Security Sentinel is the facility’s automated defense — a fast robot boss that closes distance aggressively. It dashes in bursts and strafes between volleys:
- Fight it like a duel, not a swarm: keep the Pulse Gun or Security Rifle on it and roll through the dash, not away from it.
- Its recovery after a dash combo is the reliable punish window — that’s when grenades and charged shots land.
- Robots don’t flinch like flesh enemies, so commit to full punish windows rather than single pokes.
Detailed moveset: all bosses. Victory drops a Vault Key — the third of five story keys for suit-mod vaults.
Override SCU 1
After the fight, take the corridor on the right and the door north — the first SCU override is inside. Interact to unlock one third of the Central Elevator.
Don’t leave yet: Energy Cell #2
There’s a second Energy Cell a short detour away, and it pays off immediately. From the F2 safe room where you kicked the ladder down:
- Climb up, exit left toward the extended-bridge area, and look for a weak wall on the left — charge it.
- In the small hall beyond, charge the left wall again to expose a hole into a hidden room holding Energy Cell #2.
That’s two extra mod slots banked before Containment demands them. The Factory West Shuttle is just below — ride it back to Factory East, where the southern stairs lead down to the Waterworks and Part 4.
Related Articles
End of Abyss Fractured Being: Final Boss Strategy (Both Phases)
Fractured Being final boss guide: phase 1 melee, grab and gravity attacks, phase 2 tendrils and shockwave — plus the stagger trick that trivializes its pull.
Last updated Oct 5
End of Abyss Optional Bosses: Brood Keeper, Morgue Dweller & Rematch
All three optional End of Abyss bosses — the Centipede rematch in the Reactor Pool, Brood Keeper in the Tunnels, and Morgue Dweller in the Infirmary.
Last updated Oct 5
End of Abyss Data Shards: All 8 Locations & the Secret Ending
All 8 Data Shard locations in End of Abyss — the keys, tools and burnable walls behind each, and how they unlock the secret ending at the Mainframe.
Last updated Oct 5
Was this helpful?
Thanks for the feedback!